Halloween has a way of sneaking up on us. One second, it’s back-to-school season, and the next, all your neighbors have already put up all their skeletons and fancy lights in their front yards! Meanwhile, your front yard is still barren, and your house is the only one on the street left undecorated, sad, and lonely. So now the dilemma hits – with so little time to prepare, will you choose to sprint into the crowded Halloween decor store in panic, fighting other frantic homeowners for the last, absurdly high-priced gravestone in the store, or will you give up entirely? Well, luckily, we have good news for you! You don’t need Pinterest-level decorations to celebrate holidays and spread the Halloween spirit. With simple, fun recipes that you can share with family, friends, and neighbors, Halloween can be brought to life. The best part is that you don’t even have to put in a lot of effort! Whether you choose to bring these to school for friends, share around the neighborhood to make up for your undecorated house, or just enjoy them at home, these recipes are simple and perfect for a last-minute holiday surprise.
This Halloween, we’re happy to present three easy and entertaining recipes that you can whip up in no time: the classic pumpkin pie for some nostalgic comfort, mummy (hot) dogs that will make anyone’s mouth water, and cake pops that look spooky but taste sweet! – no endless hours of deliberating over which house decorations would look the best required! Whether you’re hosting a party or sharing them with friends and family, these treats will do the trick.
Now, you must be dying to know what these recipes are all about, so let’s get right into them!
#1 – Classic Pumpkin Pie
Ingredients
Store-bought or homemade pie crust
1 can of pumpkin puree (425g)
1¼ cup brown sugar
3 eggs
1 tbsp cornstarch
1½ tsp ground cinnamon
½ tsp ground ginger
⅛ tsp ground cloves
½ tsp salt
1 cup heavy cream
¼ cup milk
Egg wash (1 egg + 1tbsp milk)
Black frosting (optional, for decoration)
Steps
Preheat your oven to 375° F(190° C).
Lightly dust a flat work surface with all-purpose flour. Take out your chilled pie crust and roll it out into a 12-inch circle using a rolling pin. Place the rolled out dough into a pie dish, pinning the dough flat against the dish and tucking in any excess dough back into itself. Then, crimp the edges of the dough using a fork to seal the folded parts of the dough. Brush the edges of the pie crust with egg wash.
Because the pie crust needs to be par-baked before adding the pumpkin filling, line the crust with a layer of parchment paper, and weigh down the bottom portion with something heavy, i.e. rice or beans. Then, bake the crust in the preheated oven for 10 minutes. Once finished, take it out and remove the layer of parchment paper and the weights, and poke the bottom of the crust with a fork all over. Put the pie back into the oven for another 7-8 minutes, or until the bottom just starts to brown.
To make the pumpkin pie filling, mix the pumpkin puree, eggs, and sugar together in a large bowl with a whisk. Once combined, add in the spices, heavy cream, and milk, and whisk until smooth.
Fill the pie crust ¾ of the way up with the pumpkin filling. Bake the pie for a total of 55-60 minutes, covering the edges of the crust with aluminum foil after 25 minutes of baking. Once it reaches the 50-minute mark, check the pie every 5 minutes until the center is slightly wobbly.
Lastly, transfer to a rack to cool for at least 3 hours, so the pie can finish cooking and cool down. Enjoy!
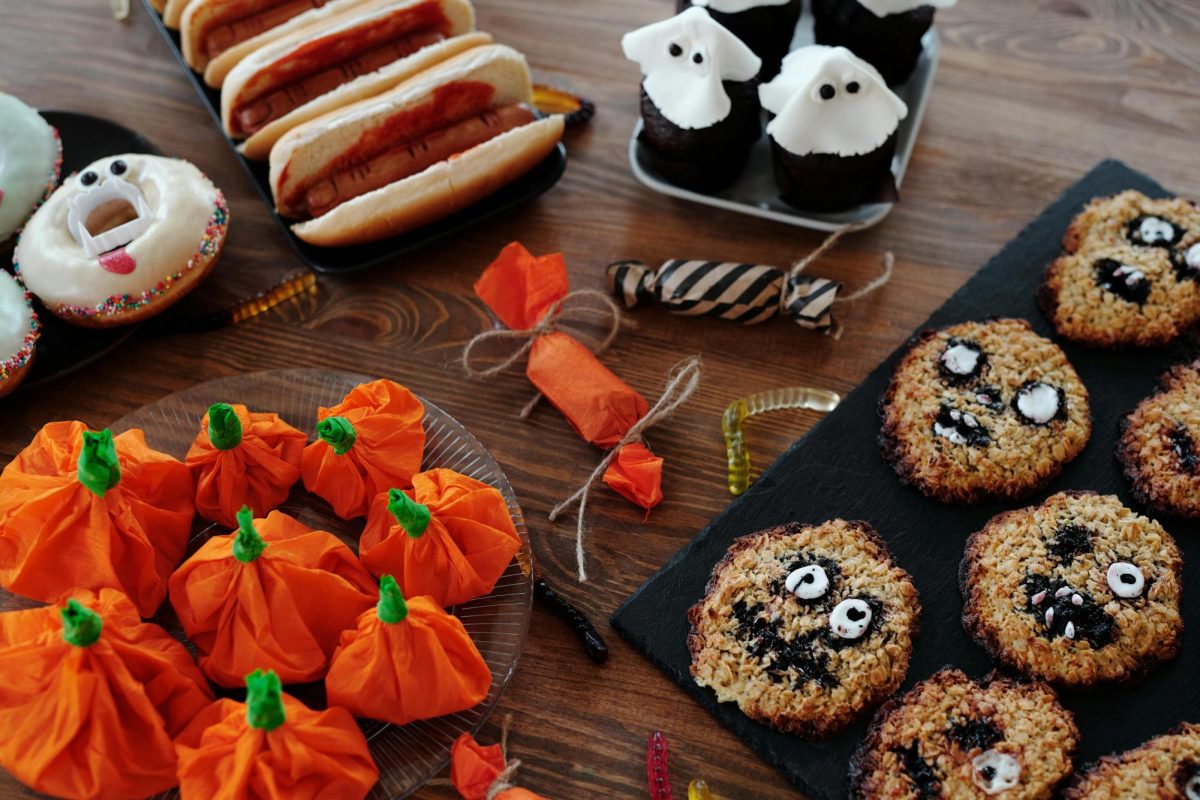
#2 – Mummy Dogs
Although Halloween is the perfect holiday to indulge in sweet treats, we know that some people prefer savory over sweet. If you’re one of them, don’t worry — we also have the Halloween snack for you! Try these fun and delicious mummydogs, a Halloween twist on the classic recipe for pigs-in-a-blanket.
Ingredients
Sausages
Crescent roll dough
Edible eyes
Garlic butter (optional)
Steps
Preheat your oven to 375° F (190° C).
Open your can of crescent roll dough, and lay it out in a rectangle on a flat work surface.
Cut your dough into ¼ inch strips, dividing your dough into long rectangles.
Wrap the pieces of dough around each sausage, shaping them in a way that resembles mummy bandages. Let the dough strips cross over each other, but make sure to leave enough gaps between the sections.
(Optional step) Prepare a garlic butter to brush over the dough by melting ¼ cup of butter and mixing in 1 tbsp of garlic, ¼ tsp salt, and 1 tsp of dried herbs. Brush the mixture over the dough-wrapped sausages using a kitchen brush.
Bake in the oven for 10-12 minutes until your mummy dogs are golden brown and delicious.
#3 – Spooky Cake Pops
Cake pops are always a great addition to any festivity! With the recipe for these no-bake, versatile Halloween-themed cake pops that take less than an hour to make, you’ll soon have a dessert that’s fun and surprisingly easy to pull together. Even if you aren’t great in the kitchen, these cake pops are still guaranteed to be a success. The best part? You can decorate them however you wish! Bring your favorite Halloween characters and concepts to life with your creativity and artistic skills!
Ingredients
Angel food cake (or flavor of your choice, or any pre-made, unfrosted cake from the local supermarket)
If you wish, you can make your own cake, but that is not necessary for this recipe!
White chocolate chips/melting chocolate
Vanilla extract
Cake pop sticks
Frosting of your choice
Food coloring (optional)
Candy eyes or other candy of your preference (for decoration)
Steps
Crumble up the cake into tiny pieces and add to a bowl.
Add your frosting to the bowl and combine until fully incorporated.
(Optional) Separate the cake “dough” into different bowls and add the amount of food coloring you would like. Stir well to combine and adjust to get the color you like.
Place the dough into the freezer for 10-15 minutes to gain a more solid consistency that is easier to work with.
Line a pan or plate with parchment paper.
Roll the dough into 1.5-inch balls and place them onto the parchment paper.
Put the cake balls into the freezer for as long as you want — the longer the better!
While the balls are freezing, melt about ⅓ cup of the chocolate chips in the microwave by microwaving at approximately 15-20 second increments, checking and stirring after each cycle. Try to keep the mixture from burning.
When the cake balls are ready, take them out of the freezer.
Stick the tip of each cake pop stick into the melted chocolate to “glue” the stick to the ball, then push it into a cake ball, repeating until all the balls have been attached to sticks.
Freeze to set.
Now comes the fun part! Dip the cake balls into the melted chocolate to completely cover them, then use a cardboard box or styrofoam to keep the sticks upright.
Wait for the chocolate to dry, then it’s time to decorate! Add eyes, icing, etc. Go as crazy as your heart desires and enjoy your cake pops!
Sources:
Mckenney, Sally. “The Great Pumpkin Pie Recipe.” Sally’s Baking Addiction, 26 Oct. 2014, sallysbakingaddiction.com/the-great-pumpkin-pie-recipe/. Accessed 20 Sept. 2025.
Kat. “Mummy Hot Dogs Recipe – Home. Made. Interest.” Home. Made. Interest., 6 Oct. 2021, www.homemadeinterest.com/mummy-dogs/. Accessed 20 Sept. 2025.
Yarro, Lorie. “The Easiest Halloween Cake Pops | Lemons & Zest.” Lemons & Zest, 12 Sept. 2020, lemonsandzest.com/halloween-cake-pops/. Accessed 20 Sept. 2025.