When you’re stuck in an office setting, there’s really nothing else to do except your work, but what if you want a break? You have some choices: you can hug the trees to make them feel happier, walk aimlessly up and down every set of stairs, or continue to scroll through every one of your apps in the hopes that something new has happened.
It’s a shame there isn’t something else more entertaining and hands-on to do…right?
This guide aims to help you relieve that boredom! It provides an especially entertaining craft that you can create with just the supplies in your pencil pouch. Make sure to use this knowledge well! Please avoid damaging any walls or people.
Here’s how to make a pencil crossbow:
Supplies Required: 5 wooden pencils (4 to build and 1 to launch), tape, binder clip (optional), 4-5 rubber bands, disposable plastic pen cap, scissors
Notes: Rubber bands can be replaced with hair ties! Strictly, only 3 rubber bands are needed; however, 5 makes the device work better. A binder clip is not necessary, but the device is easier to use with the addition of one.
Making the crossbow:
- Tape your 2 longest wooden pencils together lengthwise; the pencils should be of similar length. For best strength, wrap the tape multiple times at the top and bottom of the pencil. This is the main body of your crossbow.
- Tape the next 2 longest pencils together lengthwise. This will be the front (or prod) of the crossbow.
- Wrap 2 rubber bands along either end of your second set of pencils (from step 2).
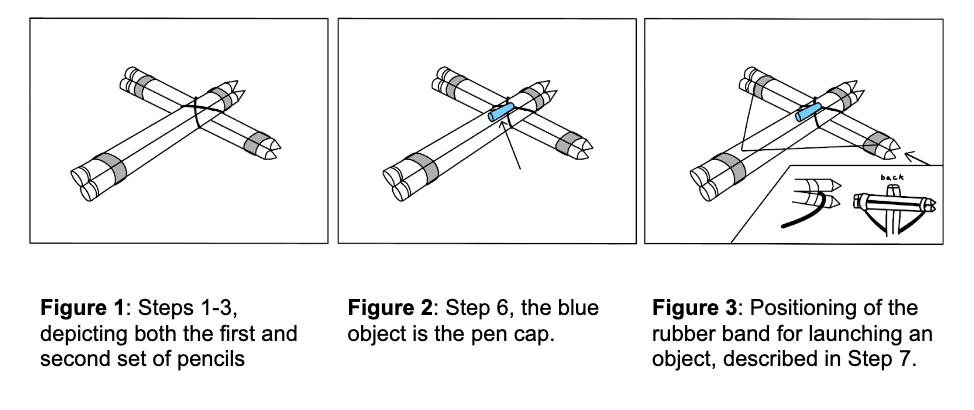
- Use 1-2 rubber bands (or hair ties) to fasten together the second set of pencils below the first set so they lie at a perpendicular angle. Make sure to wrap the rubber band tightly around the pencils so that they do not move from the perpendicular angle easily! Optimistically, the two sets of pencils should be very stable and they should not wiggle around when you try to push them apart. Refer to Figure 1 to see what your crossbow should look like at this stage.
- Cut off the top of your plastic pen cap so it is a hollow tube. Any other small, hollow plastic tube will work, such as straws.
- Tape this plastic pen cap on the top of the front of the first set of pencils (from Step 1). See Figure 2 for placement.
- Wrap your last rubber band in between the second set of pencils (from Step 2). One side of your rubber band should be able to be pulled backward along the main body of the crossbow (the first set of pencils from Step 1). Refer to Figure 3 to see what your crossbow should look like now!
- If you have a binder clip, attach it to the back of the first set of pencils.
Shooting the crossbow:
You can launch any long, thin object from your crossbow. Try the ink chamber of a pen or a very thin straw. If you do not have a binder clip, simply pull the rubber band back so that it will hit the object being launched when released. If you did add a binder clip, pull the rubber band back into the binder clip and close it. When you are ready to launch the projectile, press the binder clip open to launch the rubber band.
Please try this craft at home and do not recreate it at school; it has a high risk of hitting and harming others, and can damage your classroom walls. Good luck and have fun with this creation!




![Teacher [Milk] Tea: Part 2](https://bisvquill.com/wp-content/uploads/2024/03/Screen-Shot-2024-03-19-at-9.28.48-PM.png)


